1. Introduction
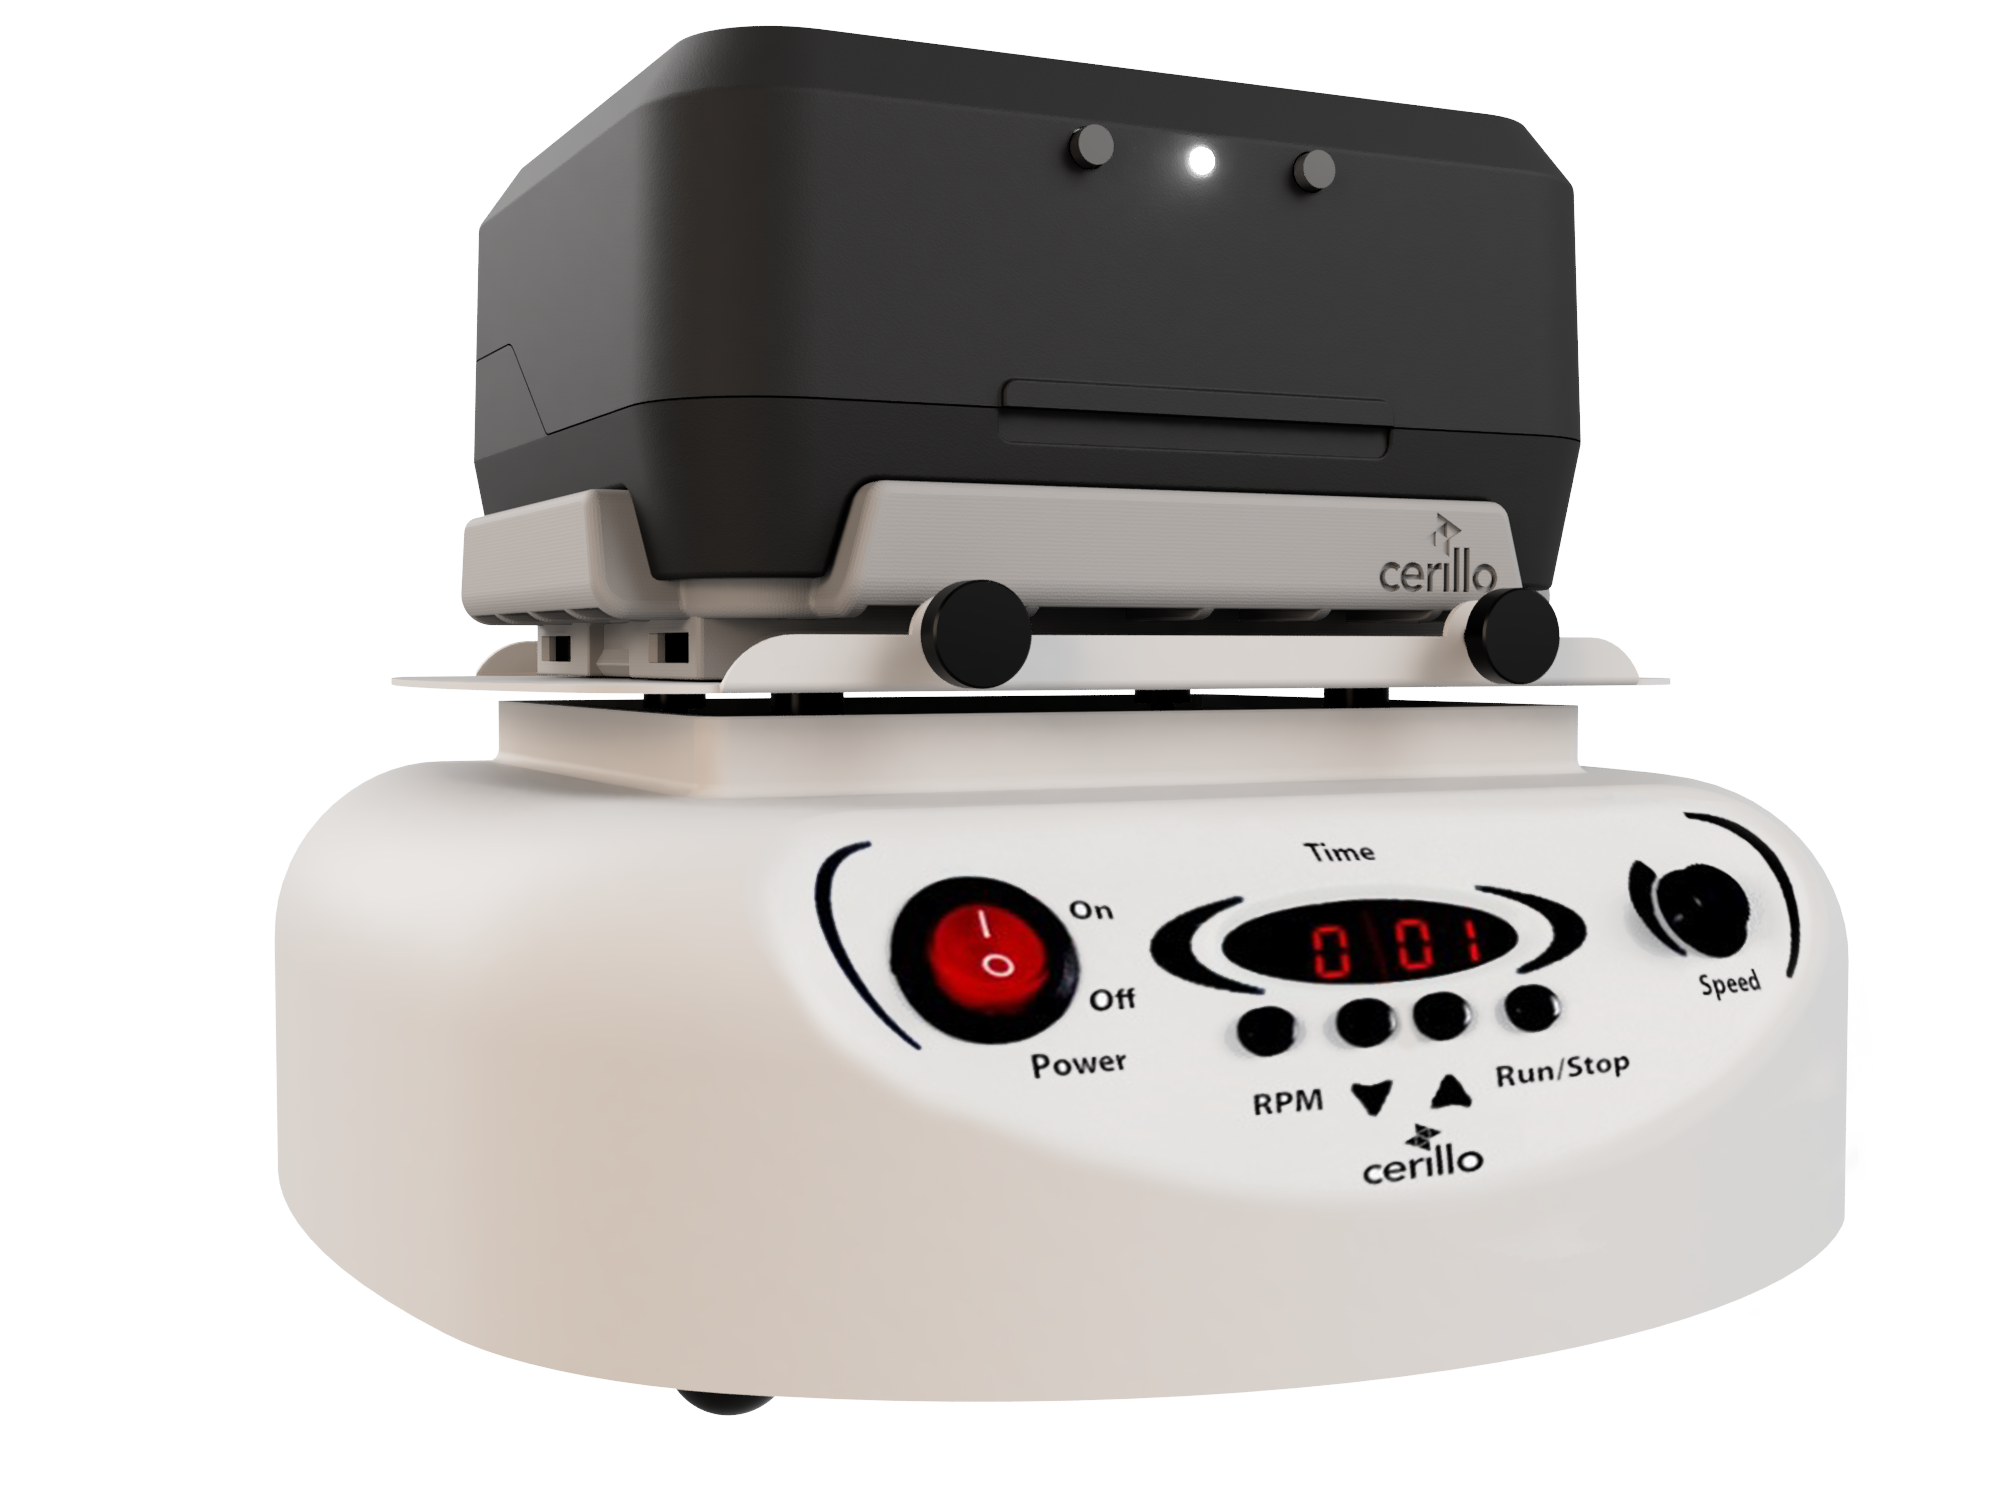
 Miniaturized Plate Reader - MRODx1r2
1.1. About the Manual
The current edition of the manual applies to the following models and versions:
Style |
SKU |
|---|---|
Stratus, 600nm |
R2600 |
Stratus, 496nm |
R2496 |
Stratus, 650nm |
R2650 |
Stratus Adapter |
R2APT |
1.2. About the Stratus
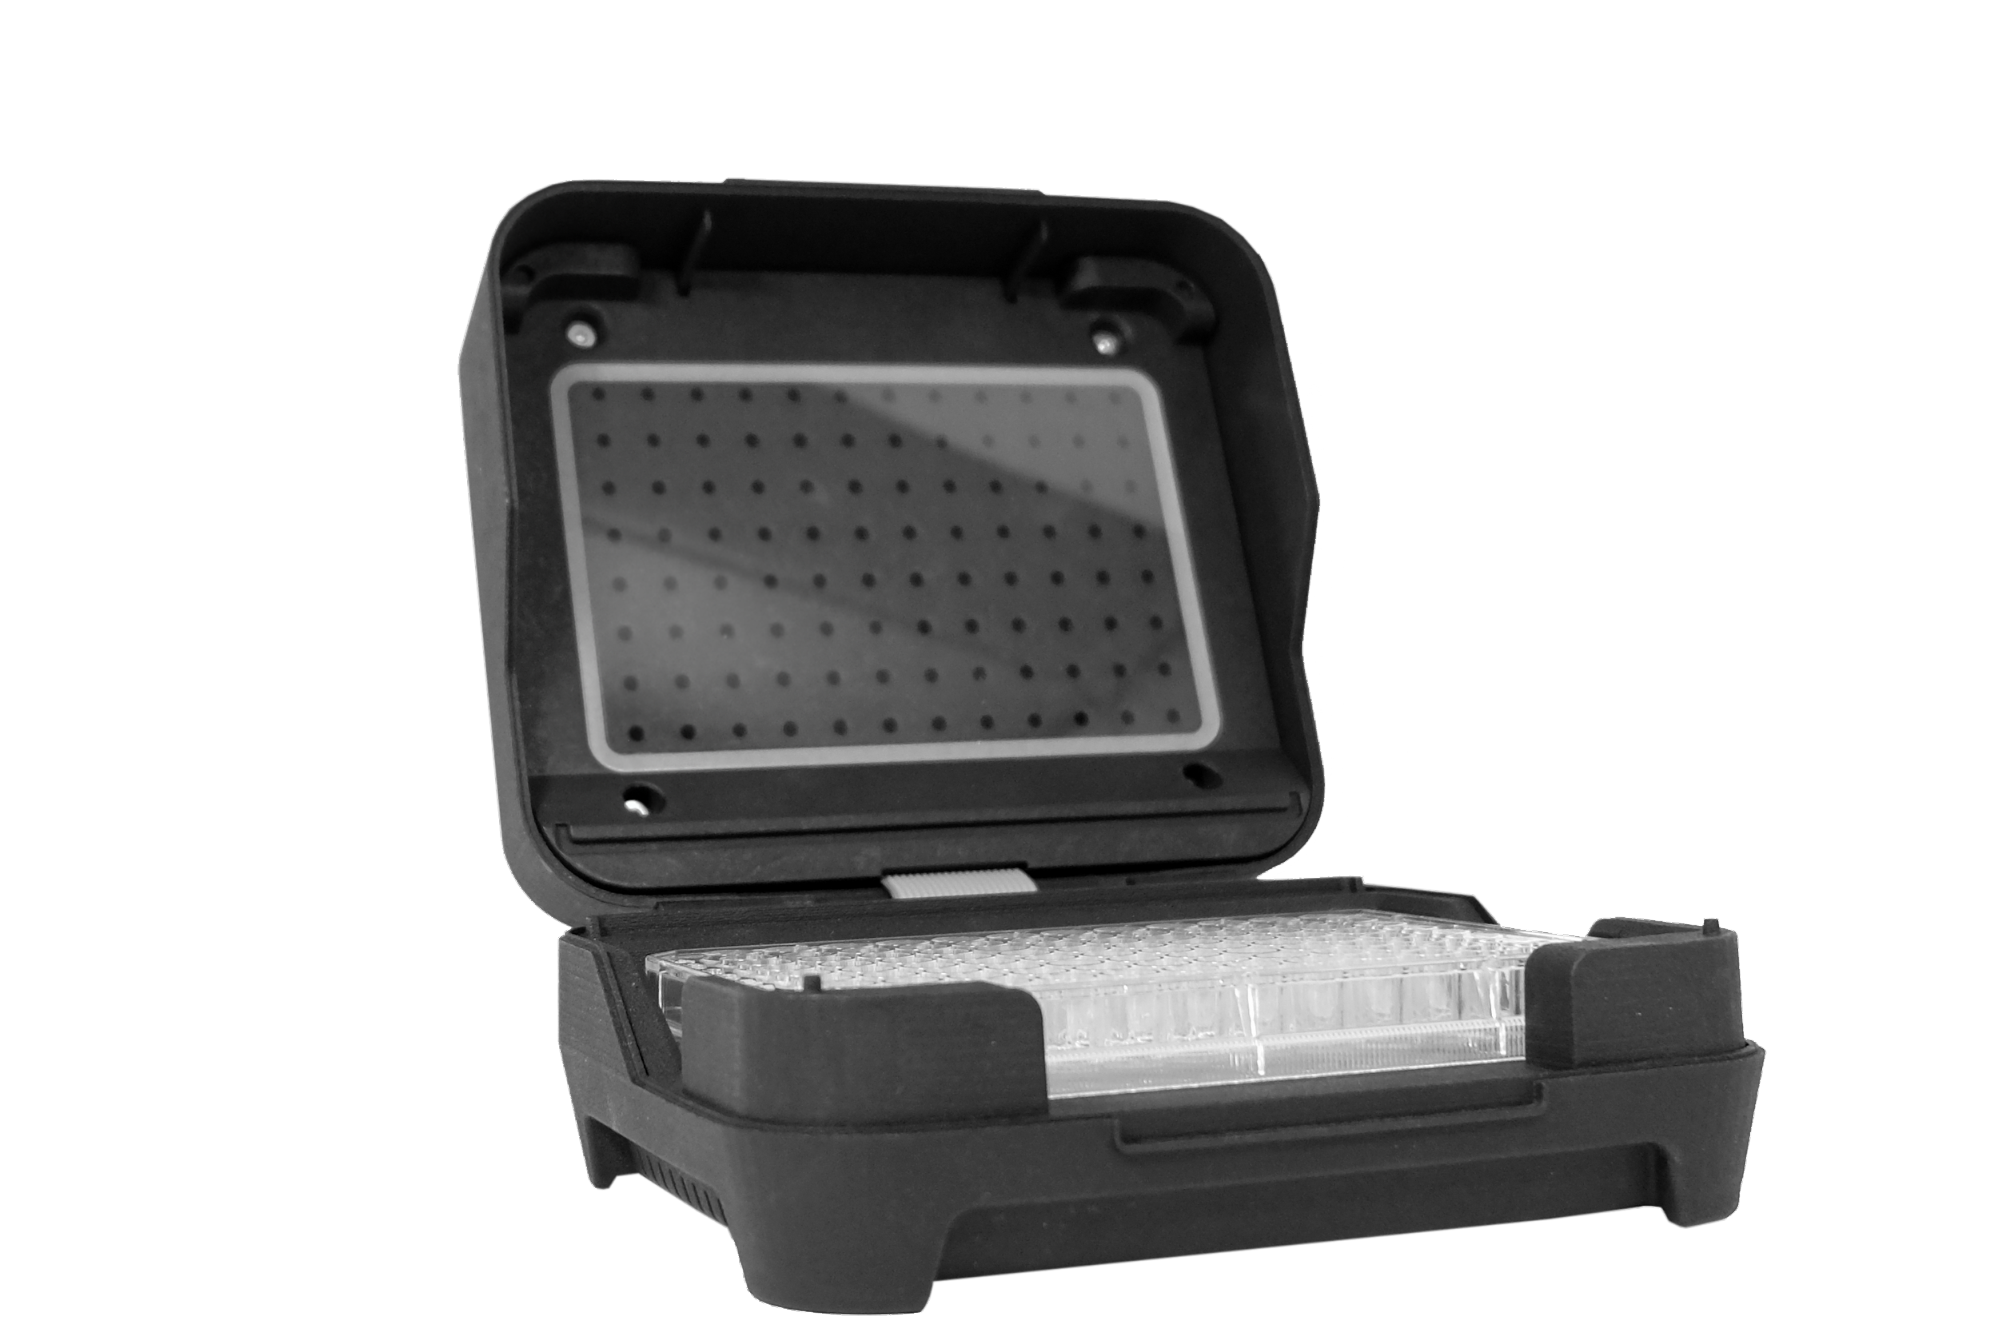
The Stratus plate reader provides continuous and single-point real-time optical density measurements with 6, 12, 24, and 96-well plates. Continuous measurements can be set at user determined time intervals. The Stratus provides single mode (absorbance) and single wavelength only, and is functional in a broad range of environments including anaerobic chambers, on shakers, in remote field settings, and in heated and humidified incubators.
2. Safety Precautions

Make sure you have fully read and understood the present manual before using the equipment.
2.1. General Safety
Protect the unit from shocks or falling.
Before using any cleaning or decontamination methods except those recommended by the manufacturer, check with the manufacturer that the proposed method will not damage the equipment.
Do not make modifications in design of the unit.
2.2. Electrical Safety
Connect only to external power supply with voltage corresponding to that on the serial number label.
Use only the external power supply provided with this product, or one approved by the manufacturer. Always ensure compatibility of the power source.
Ensure that the external power supply is easily accessible during use.
Disconnect the unit before moving, unless the device is connected to a battery pack.
Turn off the unit by disconnecting the external power supply from the power source.
Always use caution with liquid, and avoid spills as they can damage the equipment. If liquid penetrates the unit, immediately disconnect it from the external power supply and let it air dry. Contact customer support in case of concerns.
Operating conditions of the unit are defined in the specifications section (5.0).
2.3. During Operation
Do not move the unit while it’s reading. Shaking is ok if the unit is stabilized.* On larger incubators, shaking should not exceed 350 RPM, while shaking up to 500 RPM is safe on a single-plate shaker.
Do not operate the unit in environments with explosive chemical mixtures. Review section 5.2 measurement specifications for acceptable environmental conditions; otherwise please contact manufacturer for possible operation of the unit in specific atmospheres.
Do not operate the unit if it is faulty or has been installed incorrectly.
2.4. Biological Safety
It is the user’s responsibility to carry out appropriate decontamination if hazardous material is spilled on or penetrates inside of the equipment.
For decontamination, the manufacturer recommends using ETO gas, or wiping down the unit with up to a 75% alcohol or bleach based solution.
3. General Information
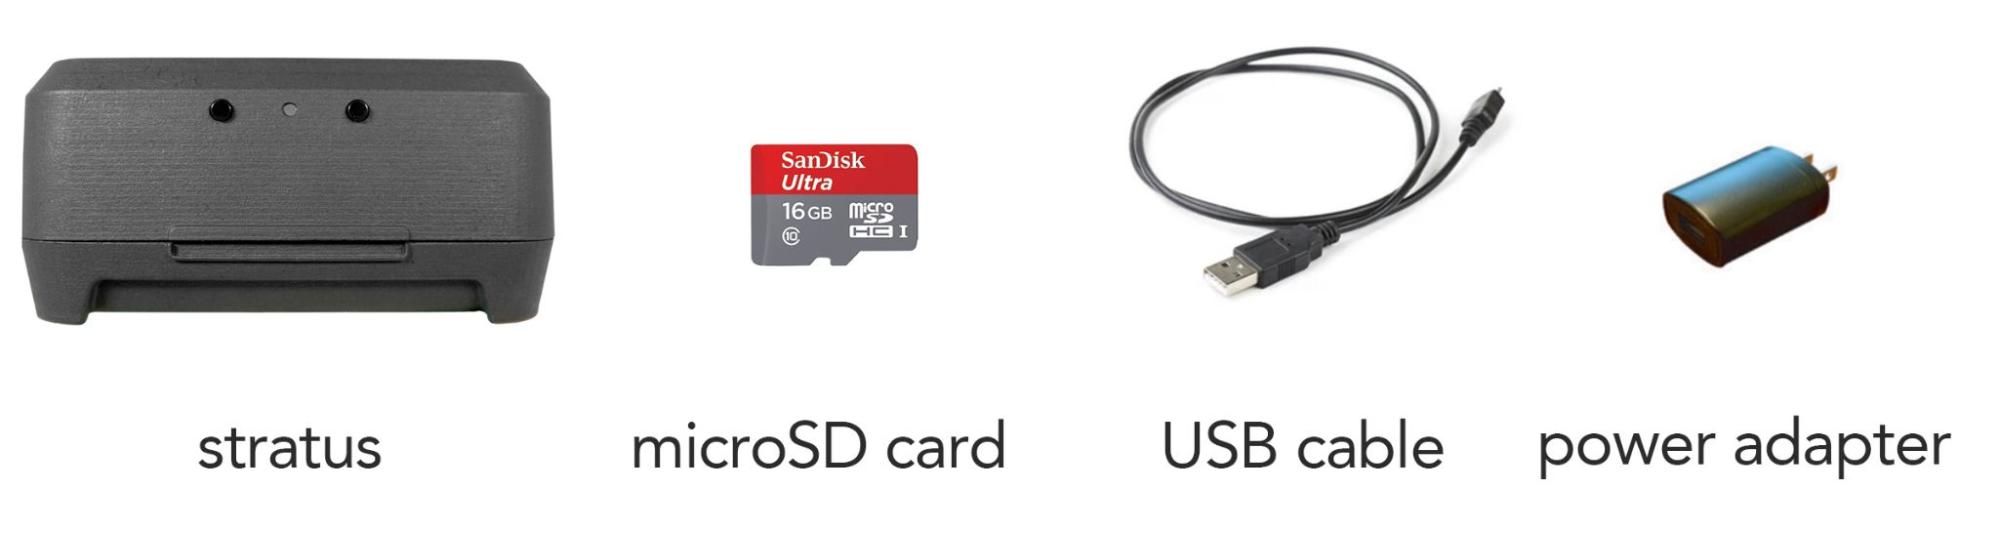
The Stratus package includes one Stratus plate reader, one USB cable, one power adapter, one 16 GB microSD card, and 1 year of firmware upgrades.
3.1. Purpose
The unit is designed to take optical density (OD) readings with a detection range between 0.0 and 3.0.
3.2. General Use and Features
The Stratus plate reader allows for measurement collection in small spaces, on shared or modular benchtops, and restrictive environments, like anaerobic or microaerophilic chambers and incubators. It can be placed anywhere, with or without a computer.
Overall, the Stratus exploits the best of modern technology so you can spend your efforts where they matter most.
3.2.1. Features
Continuous real-time measurements of optical density
Available in Standard 600 nm or customized wavelength
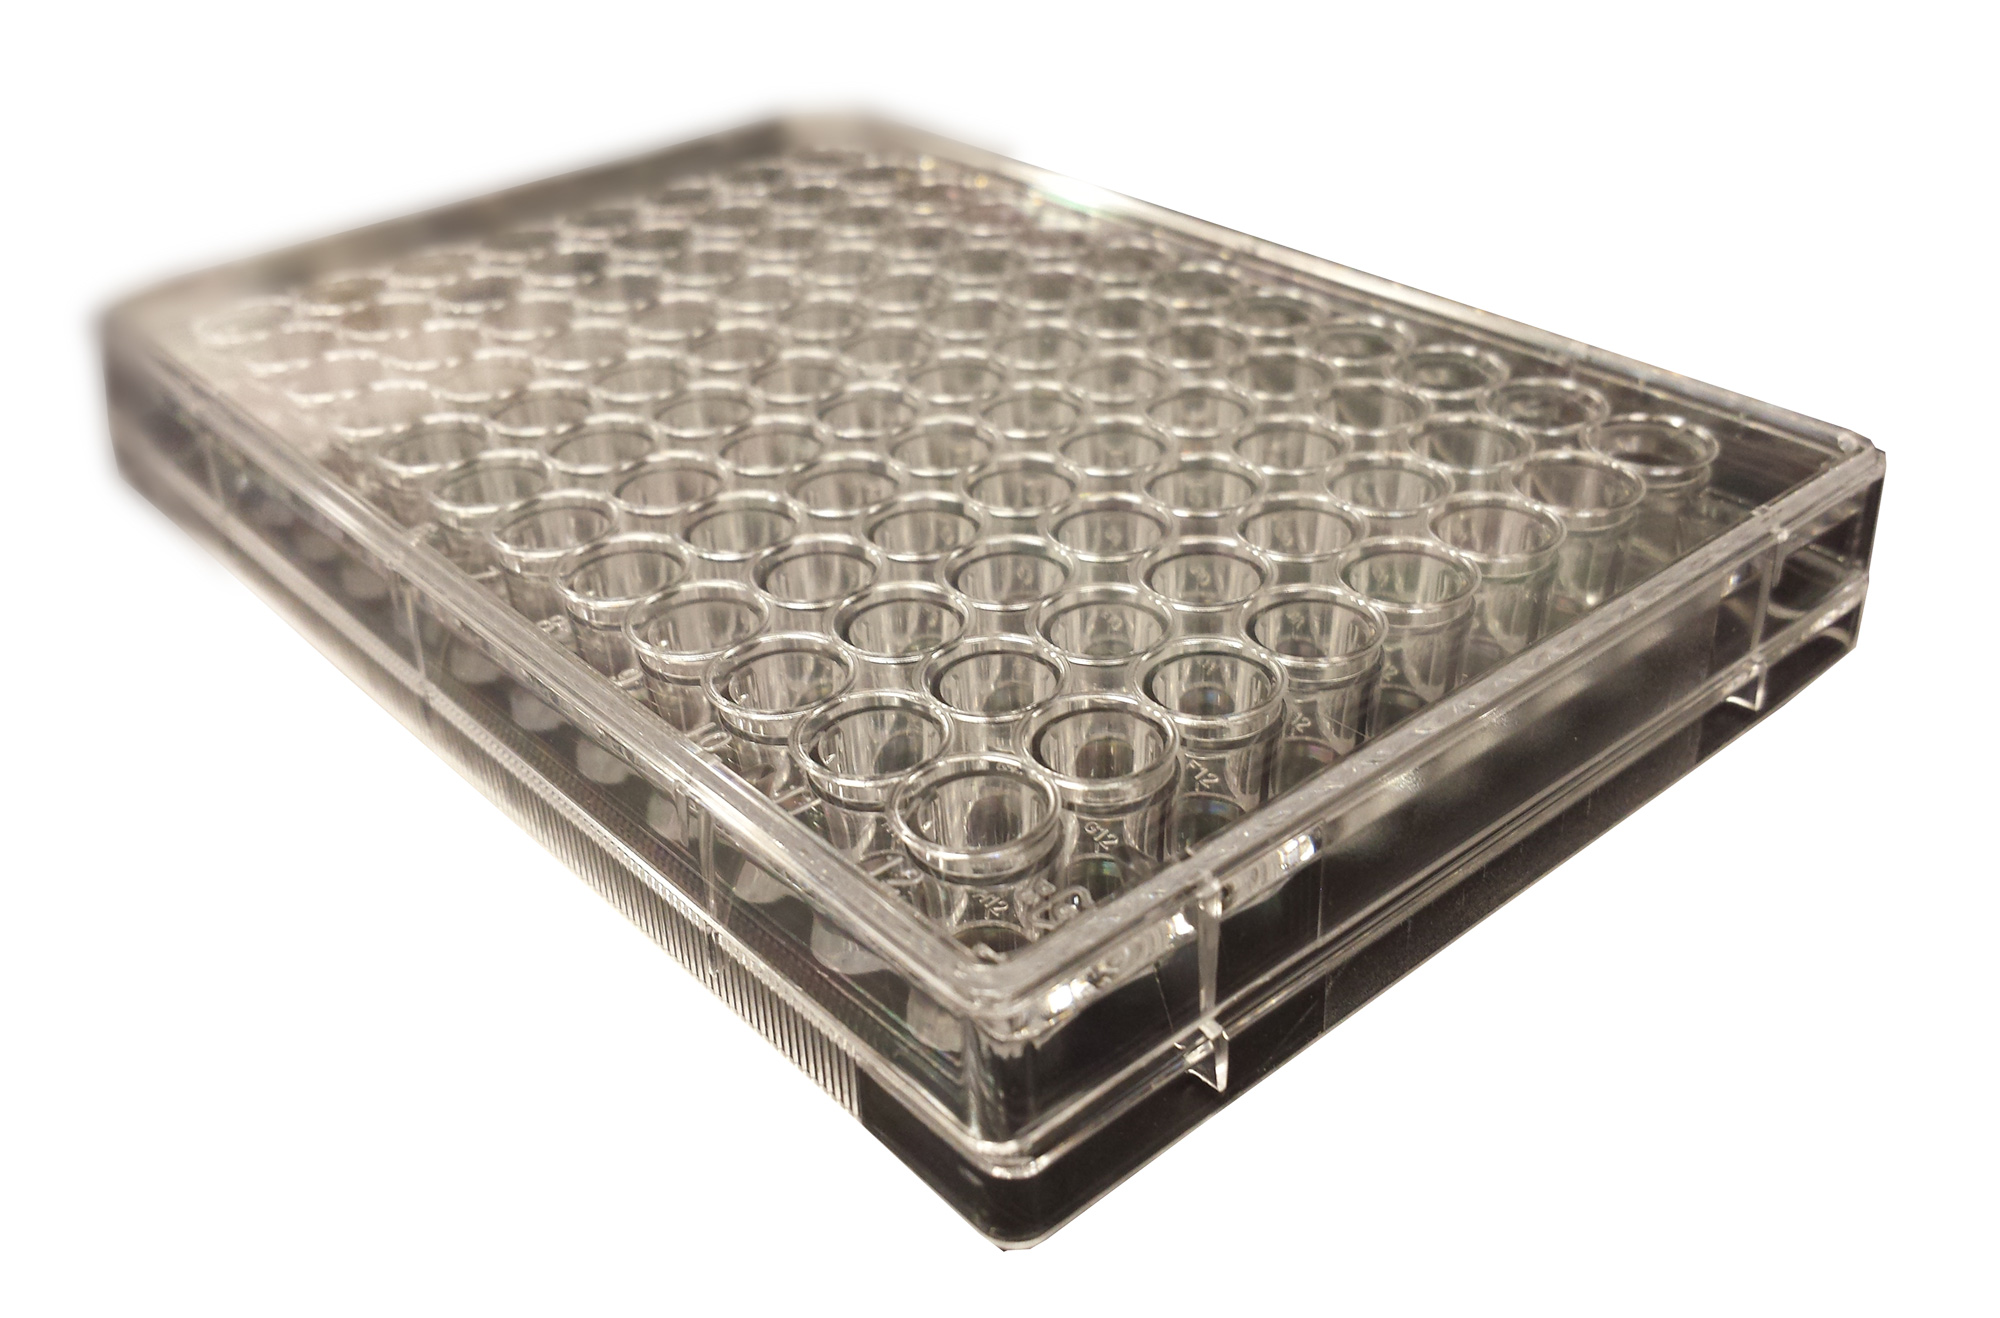
Standard 6, 12, 24, and 96-well plates
Small footprint and stackable
No moving parts; minimal maintenance
Functional in a broad range of environments
Includes a free version of the user-friendly Cerillo Labrador software
4. Getting Started & Operation
4.1. Upon Receipt
Carefully remove packing materials and retain them for future shipment or storage of the unit. Confirm receipt of all components and device and examine the unit carefully for any damage incurred during transit. The microSD card may already be installed in the Stratus.
4.2. Downloading the Software and Connecting the Device

Download the Cerillo Labrador software onto your computer at cerillo.bio/software. Then connect your device to the computer, open Cerillo Labrador, click on your device, and open the settings window to set up your device by clicking on the gear icon. You can adjust your device name, time, default measurement interval, and endpoint reading preference. Refer to section 4.8 adjusting device settings to learn more about these settings.
4.3. Location
Place your Stratus where you’d like to measure. This is anywhere your samples will be happy— in an incubator, anaerobic chamber, benchtop, hood, etc. Refer to section 5.0 specifications for limitations on environmental conditions.
4.4. Powering the Device and Calibration
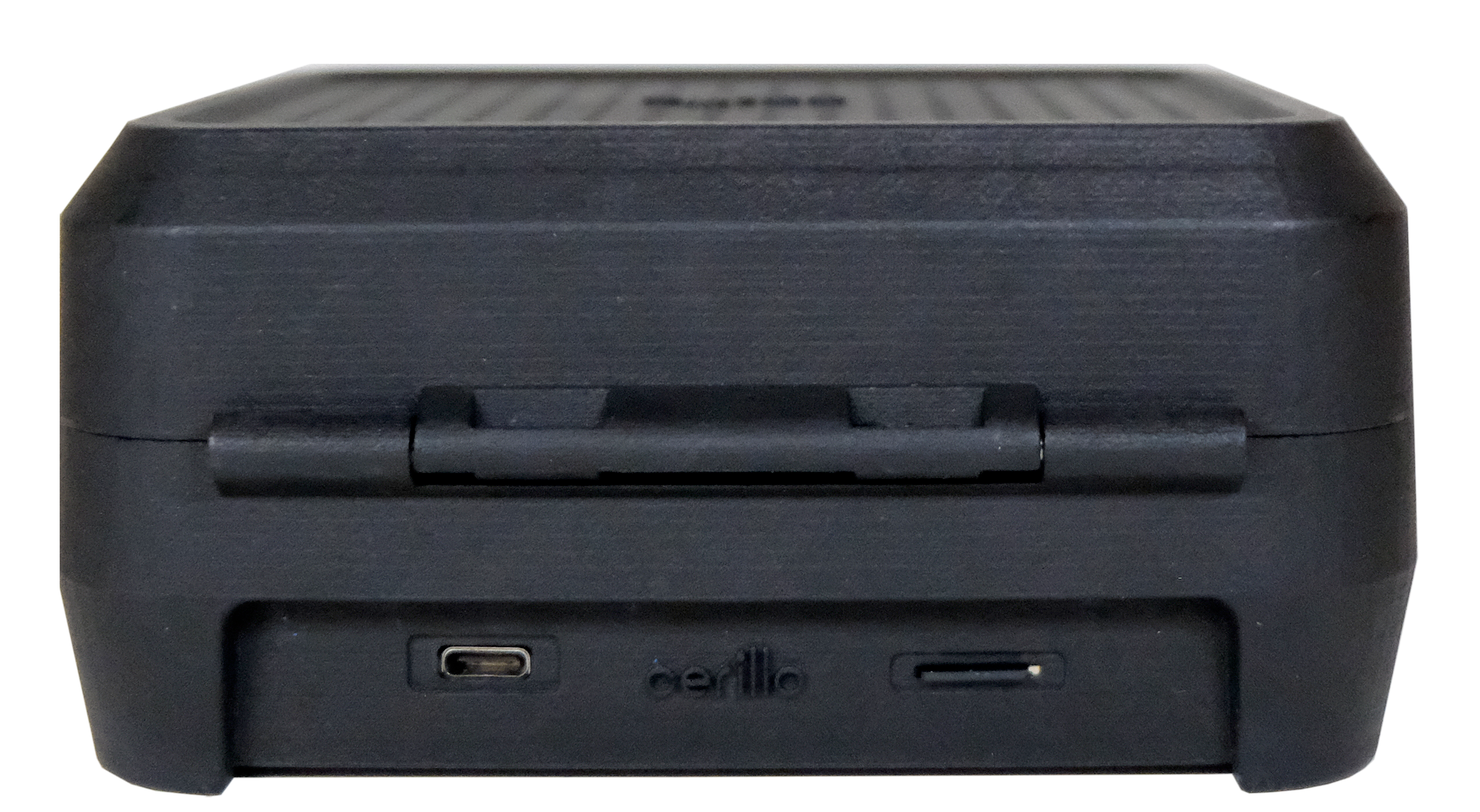
First insert the microSD card. Then plug the power adapter into a standard wall outlet, and the USB cable into the power adapter and the Stratus. Alternatively, you can use a computer or battery pack to power the device.
Ensure the microSD card is inserted for the entire duration that the Stratus is powered on and when booting.
The Stratus needs 60 minutes to equilibrate to new environmental conditions upon being powered on. It is advised to allow the device at least 60 minutes to equilibrate any time it is moved to new environmental conditions. This can be a good time to do your experimental prep work.
4.5. Controls
The Stratus can be operated by plugging the provided USB cable into a computer’s USB port instead of the power adapter. If you would additionally like to control the Stratus and read its data from that computer, refer to section 4.2 downloading the software and connecting the device for instructions. The software enables direct control, data access, and configuration of the Stratus.
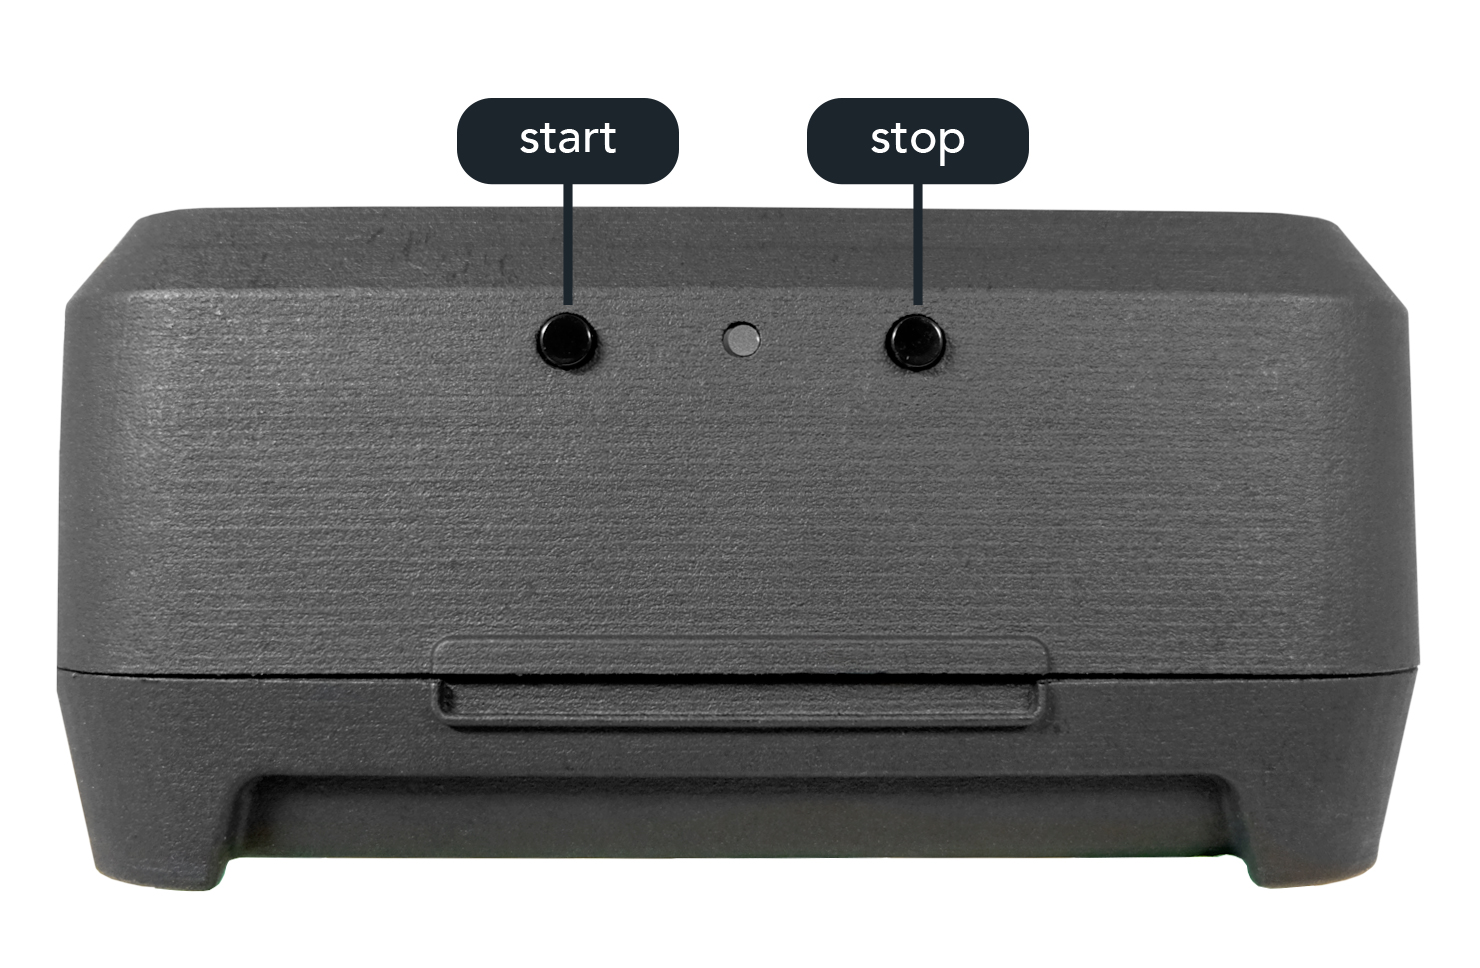
Under device settings you can also select if you would like to enable endpoint measurements.* If endpoint measurements are enabled (checked), the “start” button has two functions. The first function is to start an endpoint reading by quickly pressing the “start” (left) button. The second function is to start a kinetic read which requires you to hold the “start” button until the status light flashes.
Note
The stratus is a kinetic plate reader and is not optimized for endpoint measurements below 0.5 OD.
The “stop” button also has two functions when endpoints are enabled. If held it will start a calibration, and if pressed it will stop an experiment. If the endpoint measurement are disabled (unchecked), the “start” button will start a kinetic read no matter how long the start button is held and the “stop” button will only stop experiments.
4.6. Starting an experiment
Following environmental equilibration, measurements can begin. For kinetic measurements, the device will auto-calibrate after the start button is pressed. This is indicated by a cyan status light. Place your experimental plate in the Stratus prior to starting the kinetic reading; calibration should take place with the plate inserted. Calibration zeros all wells. Your Stratus will read every 3 minutes; if you would like to customize the interval refer to section 4.8. To stop a reading in progress, press the “stop” (right) button until the status light turns red. Alternatively, if your device is plugged into a computer, you can use the Cerillo Labrador Software to operate the Stratus.
Refer to section 4.8 to enable quickreads. If enabled, to start quickreads calibrate the device manually by holding the “stop” button (right) until the status light flashes white/green. Your device should be calibrated whenever the device changes environmental conditions. Your experimental plate should be inserted into the Stratus after the calibration step. The experiment can then be started by pressing the “start” (left) button.
When endpoints are enabled, the single-press “start” button behavior will change, but kinetic experiments can still be started by pressing the “start” button until the status light flashes white/green.
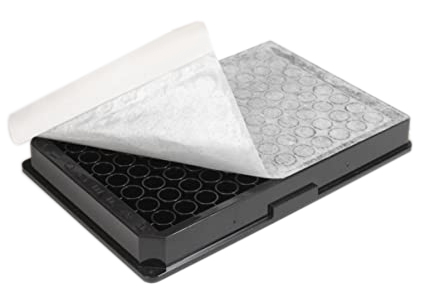
Measurements can be taken with or without a plate lid, or breathable membrane. The Stratus should be at a constant temperature throughout the experiment. Avoid large changes in any environmental conditions, especially during the calibration phase.
4.7. Accessing data
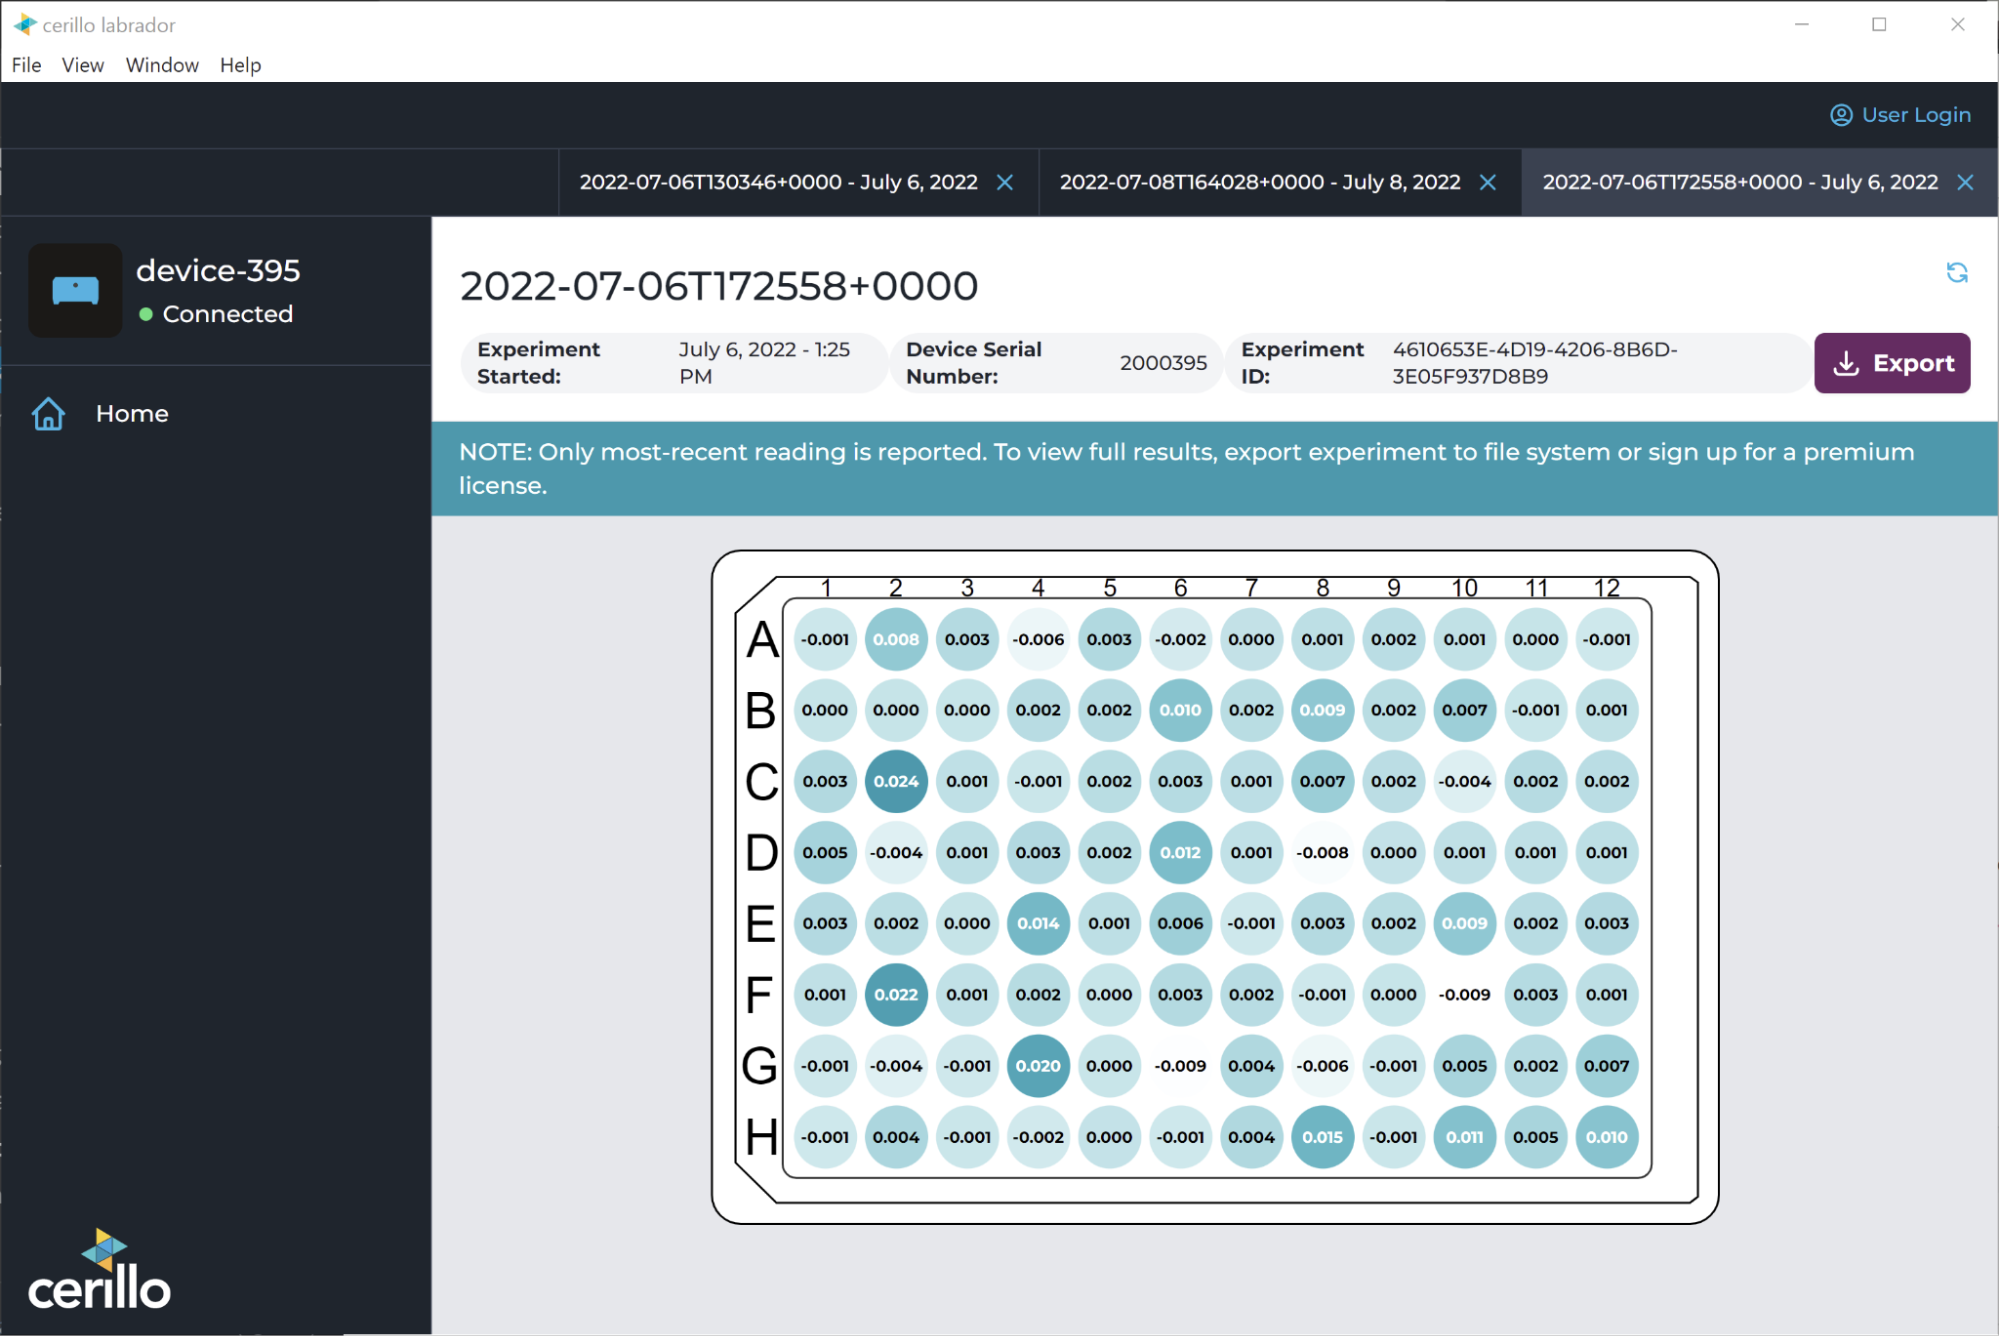
Collected measurements are automatically stored on the on-board microSD card. You can use any commercially available adapter to access the data from the card. When inserting the card into the Stratus, do so with the Stratus unplugged; otherwise, the card will not be recognized and future data will not be recorded. The supplied microSD card is 16GB and is sufficient to hold 4 weeks of continuous data at the maximum sampling rate. Any standard microSD card is compatible with the Stratus, but must be 32GB or less.
When viewing data on the microSD card, data files are found under “experiments” then organized by start date.
Experiment files are saved as standard .csv files, and can be opened in any spreadsheet or data analysis software. The figure below shows what an experiment looks like in the software.
4.8. Adjusting device settings
To change the interval of which your measurements are taken, use the Cerillo Labrador software to plug in your device, access device settings, and select your preferred interval time. The Stratus will then recall this custom interval, even when plugged into a wall outlet or battery source. For specific instructions on how to use the software and adjust device settings, you can access the user manual here.
4.9. Using stratus with shakers
 The Stratus can be placed on a variety of different shaking platforms. We recommend the Cerillo Microplate Shaker, however, other shaking devices are also compatible with the device. When utilizing the Stratus Shaking Adapter (SKU: R2APT), the Stratus can securely be attached to most shakers.
Regardless of how the Stratus is attached to a shaker, the device is able to measure during shaking; there is no need to program a shaker to stop shaking during measurement. Special care should be taken to make sure the device is securely affixed to avoid liquid spills or the device moving around the shaking platform. When setting up the Stratus on a shaker, ensure that there is slack provided in the power cable to avoid the device becoming unplugged.
4.10. Using Stratus within chambers
4.10.1. Anaerobic chambers, Micoaerophilic chambers and CO2 chambers
The Stratus is designed to be resistant to environmental conditions common in anaerobic chambers, microaerophilic, and CO2 chambers. It can also be imported through airlocks utilizing vacuum cycles. You can store the plate reader within chambers long-term. Refer to the table in section 5.2 measurement specifications for compatible gas concentrations.
4.10.2. Incubators and refrigerators
Since the Stratus does not make its own environmental conditions, it is common to place the device within the conditions of interest. The Stratus has been tested from 0° - 50°C and is operable within that range. Note, that when the device is placed in heated, or cooled environments, best results will be achieved when the device is equilibrated to that environment for 1 hour prior to starting a measurement as detailed in section 4.4. Additionally, samples and plates placed within the device should also be at the experimental temperature, or equilibrated to it prior to measurement. Improper equilibration can result in condensation development which can hinder measurement accuracy.
5. Specifications
5.1. General
Detection Method |
Absorbance |
|---|---|
Detection Mode |
Kinetic |
Plate Type |
6-, 12-, 24-, 96- well plates |
Dimensions |
W: 14.4 cm D: 13.0 cm H: 6.8 cm |
Weight |
580 g |
Power |
5V, 500mA USB Supply |
5.2. Measurement
Environmental Tolerance |
Temp: 0-50°C Humidity: 0-99%, O2 Concentration: 0-21%, CO2 Concentration: 0-25% |
|---|---|
Wavelength |
Single Wavelength: 600nm, 496nm, 465nm, or 650nm. Custom wavelengths available upon request |
Light Source |
Monochromatic LEDs |
Resolution |
±0.005 OD |
Detection Range |
0.000 - 3.000 OD |
Linearity |
< ±1% (0.000 - 2.000 OD) |
Accuracy |
< ±1% and ±0.015 OD (0.000 - 2.000 OD) |
Repeatability |
< ±1% and ±0.006 OD (0.000 - 2.000 OD) |
Data Storage |
microSD up to 64 GB (>500M Samples) |
Status LED Colors |
|
|---|---|
White |
Booting |
Green |
Reading |
Yellow |
Between readings |
Red |
Stopping or error |
Cyan/Blue |
Calibrating |
Accuracy |
< ±1% and ±0.015 OD (0.000 - 2.000 OD) |
Repeatability |
< ±1% and ±0.006 OD (0.000 - 2.000 OD) |
Data Storage |
microSD up to 64 GB (>500M Samples) |
5.3. Software
Operating System |
macOS: 11 (Big Sur), 12 (Monterey) Windows: 10, 11 |
|---|---|
Data Export Format |
CSV |
5.4. Compatible Accessories
5.4.1. Multiwell Plates
The Stratus is compatible with all flat-bottom, standard well format plates, including tissue culture and non-tissue-culture treated plates (6, 12, 24, and 96 wells).
5.4.2. Power bank
The Stratus can be connected to a power bank. The Stratus operates well when connected to Anker brand power adapters. Their 10000 mAh batteries will run the Stratus for 48-72 hours depending on the temperature and measurement interval.
5.4.3. Plate sealing film
While a variety of plate sealing films are suitable for the Stratus, we have used and recommend Diversified Biotech’s “Breathe-Easy” brand membranes, catalog number BEM-1. If using other membranes, ensure they are transparent.
5.5. Data Storage
Data is automatically stored on the microSD card that comes with the device. Once you have copied data off of the device, either through the software or card adapter, you can safely delete the corresponding experiment folders in the “experiments” directory on the card. Please note, however, that your data will not be recoverable once deleted, and keeping a backup copy on the card may help with future troubleshooting.
5.6. Calibration
The Stratus auto-calibrates (green light) at the beginning of every kinetic read to set each value at 0 OD. It measures the net change in OD from timepoint 0. If endpoint readings are enabled, calibration can be done automatically by holding the right button, or interfacing with the software.
6. Resources
Documentation about the Stratus can be found at https://cerillo.bio/resources/
The Cerillo Labrador (Stratus software) user manual can be accessed here
7. Guarantee and Service
7.1. Guarantee
When used in laboratory conditions and according to these working instructions, this product is guaranteed for two years against faulty materials or workmanship.
7.2. Service and maintenance
There are no user-serviceable parts inside the unit. For all repairs (except as outlined below) contact our service department at support@cerillo.bio.
7.3. Cleaning and disinfection
7.3.1. Cleaning
The Stratus can be wiped down with a lint free cloth to remove any dust or debris.
7.3.2. Disinfecting exterior parts
The Stratus can be disinfected with ETO gas, or wiped down with up to a 75% alcohol or bleach based solution. Do not spray solutions into the perforations in the device. Spray a lint free cloth with the cleaner and use it on the device to disinfect the unit. The exterior color of your device may rub off on your cloth for the first few cleanings.
Note
No parts of the unit can be safely autoclaved.
8. Compliance
The Stratus is RoHS compliant, CE certified, made in the USA, and has a two year warranty.
EU Declaration of Conformity
All the products covered by this manual comply with the requirements of the EU harmonized legislation verified using the following standards
EMC directive (2014/30/EC) for Electromagnetic compatibility |
LVS EN 61326-1 |
|---|---|
RoHS Directive (Directive 2011/65/EC including 2015/863) for Hazardous substances |
LVS EN 50581 |
9. More Information & Troubleshooting
To learn more about Cerillo and our products, visit www.cerillo.bio or email us at info@cerillo.bio.
Need support? Email our technical support team at support@cerillo.bio.
9.1. Troubleshooting
9.1.1. Stratus device not recognized by computer
Restart Software
If your device is responsive to pressing the buttons, download the FTDI driver: www.cerillo.bio/ftdi
If the device is not responsive to pressing the buttons, follow device recovery instructions: https://cerillo-app-documentation-prod.s3.amazonaws.com/latest/troubleshooting/device-recovery.html
9.1.2. Can’t install software
For specific installation instructions, you can access the Cerillo Labrador Software instructions at cerillo.bio/software. If you did not receive the download link via email after filling out the download form, email support@cerillo.bio.
9.1.3. Stratus stops taking readings mid-way through an experiment
Primary causes:
Battery power ran out or device became unplugged.
Duration setting applied under device settings.
Device was in endpoint reading mode. If endpoints are enabled, start button must be held until Stratus light flashes to start a continuous read.
9.1.4. Data issues
Missing data files Primary causes:
The device is powered on without the microSD card, or the microSD card was removed and reinserted while the device remained powered on. If the device is plugged in when the microSD card is placed inside, it will not recognize the microSD card is there and cannot record data to it.
Solution: Ensure that the Stratus is unplugged whenever the microSD card is put in the device. If the device is already on it will not recognize that the microSD card was placed in the device. In case the device is powered on without an SD card, the device will have a red status.
Only use the supplied microSD card. If a replacement card is needed, be sure to format to FAT32 prior to using and only use cards under 32 GB capacity.
Corruption of the microSD card (data is unreadable).
Solution: try formatting the microSD card.
Format the microSD card on Windows:
Insert the microSD card directly into your computer or utilize an adapter if your computer does not have a microSD card slot
Copy any data off of the microSD card that you would like to keep
Open File Explorer
Right-click on the microSD card drive, select “Format”
A formatting window will pop up. Under the file system drop down, select FAT32.
Uncheck “perform a quick format”
Select OK
Format the microSD card on macOS:
Insert the microSD card directly into your computer or utilize an adapter if your computer does not have a microSD card slot.
Save any data on the microSD card that you would like to keep
Open Disk Utility. It is available through the Applications Folder in a Utilities subfolder. You can also use Spotlight search to open it by name.
In the sidebar of Disk Utility, search for your memory card and select the volume. Typically you’ll find it under the name of the manufacturer of the memory card, and it will have a volume title that matches the name of the drive when it mounts, as well as matching capacity.
Once you have established that you have selected the correct volume, click Erase.
Enter a name for the memory card
Select the format for the memory card as FAT32
Click Erase
Once formatting has completed, click “Done”
9.1.5. Increases in OD of blank samples
The most common cause for increases in OD of blank samples is temperature increases or condensation. If these have been ruled out complete the following steps:
Ensure the plate reader is in the experimental environment and plugged in for 1-hour prior to starting an experiment
Prior to placing the plate in the plate reader, shake it on an orbital shaker (~1000rpm) for a few seconds. If a small shaker is not available, tap your prepared plate on the lab bench a few times to break the surface tension of the samples. This helps normalize the liquid in the wells. While not required, under certain circumstances it can lead to better results.
Ensure minimal temperature change over the course of the experiment
9.1.6. Condensation issues leading to incorrect readings
Make the following adjustments to resolve condensation issues:
Make sure the plate and media are at the same temperature as the experimental conditions. Abrupt changes in temperature can cause condensation.
Use a breathable membrane instead of a plate lid if condensation builds on the lid.
Increase ventilation in the environment by adding a small fan or placing the Stratus on a shaker.
Ensure the temperature is consistent for the duration of the experiment. Changes in temperature can increase the chance of condensation developing.
9.1.7. How to get support
To report a software bug or get technical support, email our technical team at support@cerillo.bio.
10. Ordering Information
10.1. Currently available models and accessories
Model |
SKU |
Description |
|---|---|---|
Stratus, 600nm |
R2600 |
The Stratus, 600nm includes one Stratus plate reader, one USB cable, one power adapter, one 16 GB microSD card, and 1 year of firmware upgrades. |
Stratus, 496nm |
R2496 |
The Stratus, 496nm includes one Stratus plate reader, one USB cable, one power adapter, one 16 GB microSD card, and 1 year of firmware upgrades. |
Stratus, 650nm |
R2650 |
The Stratus, 650nm includes one Stratus plate reader, one USB cable, one power adapter, one 16 GB microSD card, and 1 year of firmware upgrades. |
Stratus Adapter |
R2APT |
The Stratus, 600nm includes one Stratus plate reader, one USB cable, one power adapter, one 16 GB microSD card, and 1 year of firmware upgrades. |
Stratus 4-Pack, 600nm, 496nm, 650 nm or custom wavelength |
The Stratus 4-Pack includes four Stratus plate readers, four USB cables four power adapters, four 16 GB microSD cards, and 1 year of firmware upgrades. |
The Stratus 4-Pack includes four Stratus plate readers, four USB cables four power adapters, four 16 GB microSD cards, and 1 year of firmware upgrades.
For more information about Cerillo products and related accessories, visit https://cerillo.bio/products/.
10.2. Ordering
For information on ordering Stratus units, parts and accessories, contact us at:
sales@cerillo.bio
+1 434-218-3151